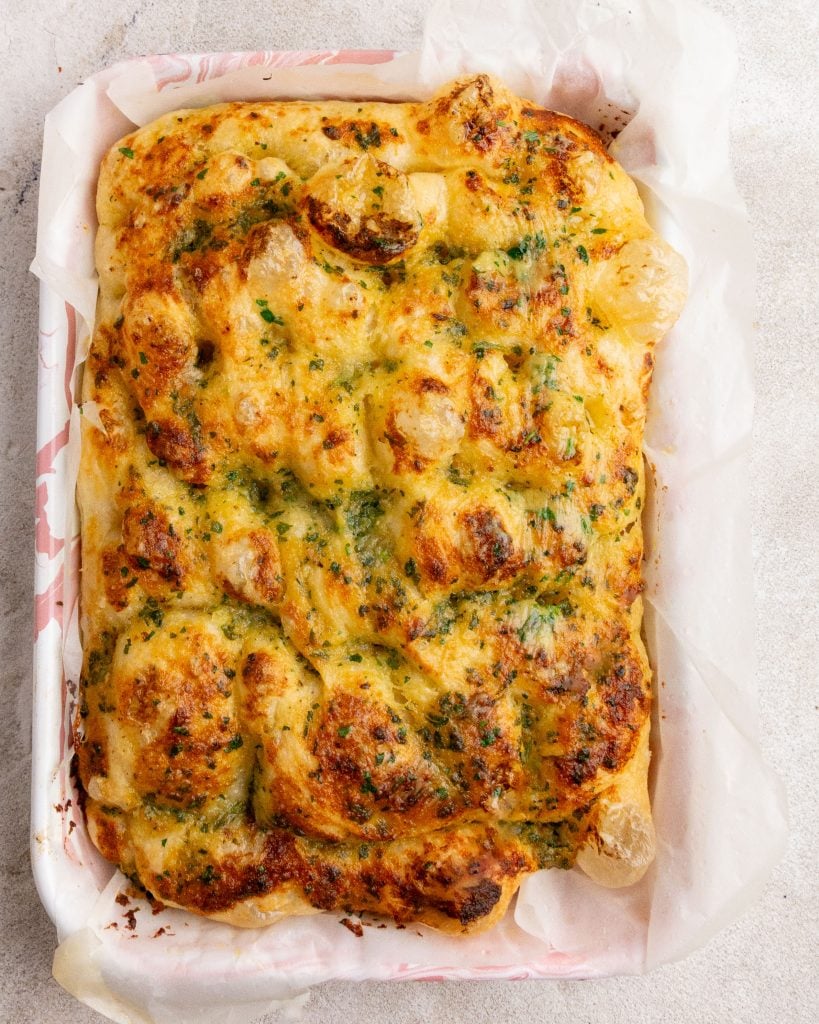
Garlic Butter No-Knead Focaccia
Nov 15, 2023, Updated Jul 10, 2024
Jump to RecipeThis post may contain affiliate links. Please see our disclosure policy.
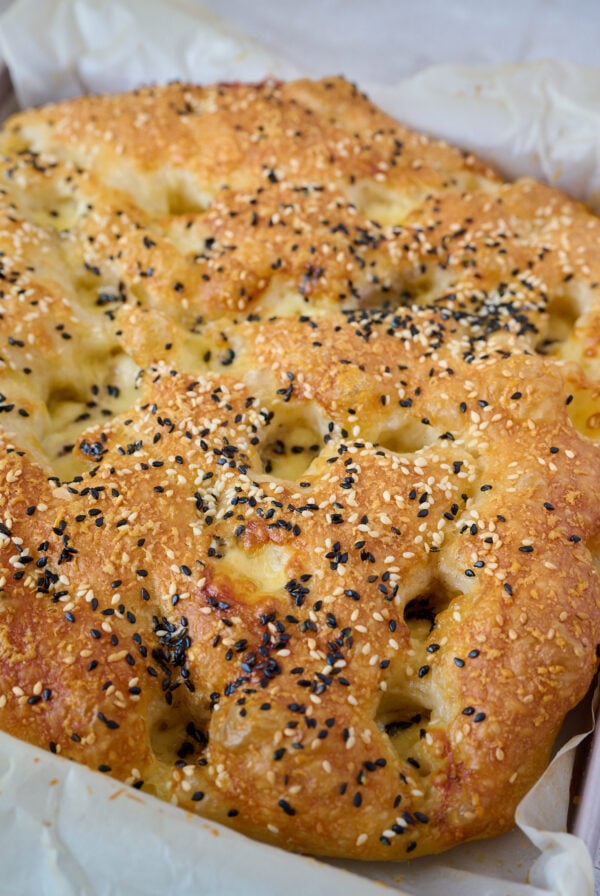
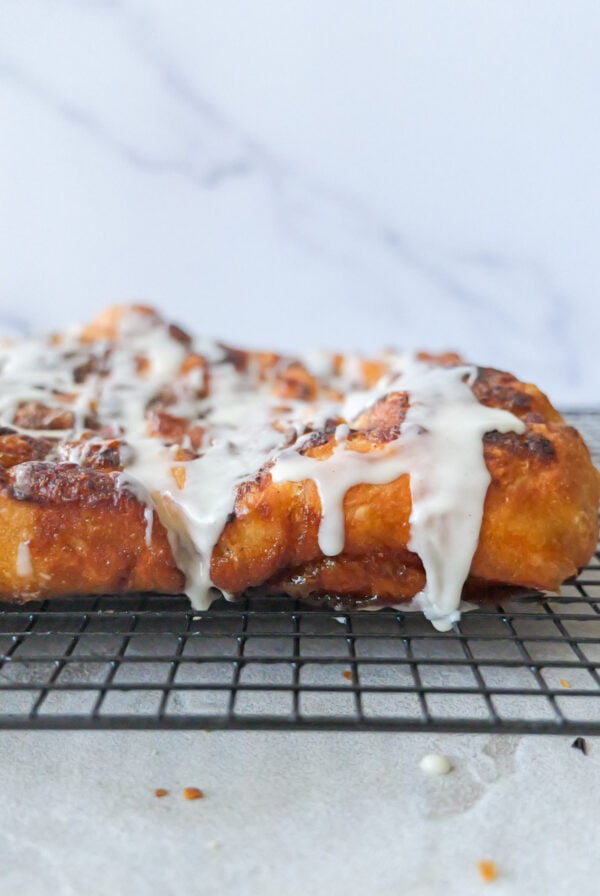
There is nothing ordinary about this garlic butter no-knead focaccia. I have become known for my signature no-knead focaccia, my beloved garlic confit and, of course, my obsession with slathering garlic butter onto anything I can. This recipe brings together all three of my most famous “Daen’s Kitchen” staples into one incredibly fluffy, golden and buttery focaccia that is the ultimate upgrade to classic garlic bread. Best of all, the dough is completely no knead, making this show-stopping bread unbelievably easy to make.
Why you’ll love this garlic butter no-knead focaccia!

You are going to fall head over heels for this focaccia. It has everything I love in one bite! That beautiful mellow flavour from my garlic confit, the richness of homemade garlic butter and the fluffy, olive-oil-kissed focaccia that so many of you now make weekly. I have shared so many focaccia toppings over the years, from juicy tomatoes, salty olives to a sweet cinnamon scroll version, but this one feels extra special because it brings all my signature flavours together
It feels cosy, familiar and a little bit indulgent, like something you’d proudly place in the centre of your Thanksgiving, Christmas or dinner party table and watch disappear in minutes. And let me tell you this, it truly does disappear in minutes! And because the dough is no knead, it’s one of those recipes that anyone can make, whether you’re a seasoned baker or just dipping your toes into bread making.
Ingredients Needs for Garlic Butter No-Knead Focaccia
The ingredients for this garlic butter focaccia are beautifully simple, using a handful of pantry staples and my signature garlic confit to create the most flavour-packed bread. Ingredients for the dough are pictured below.
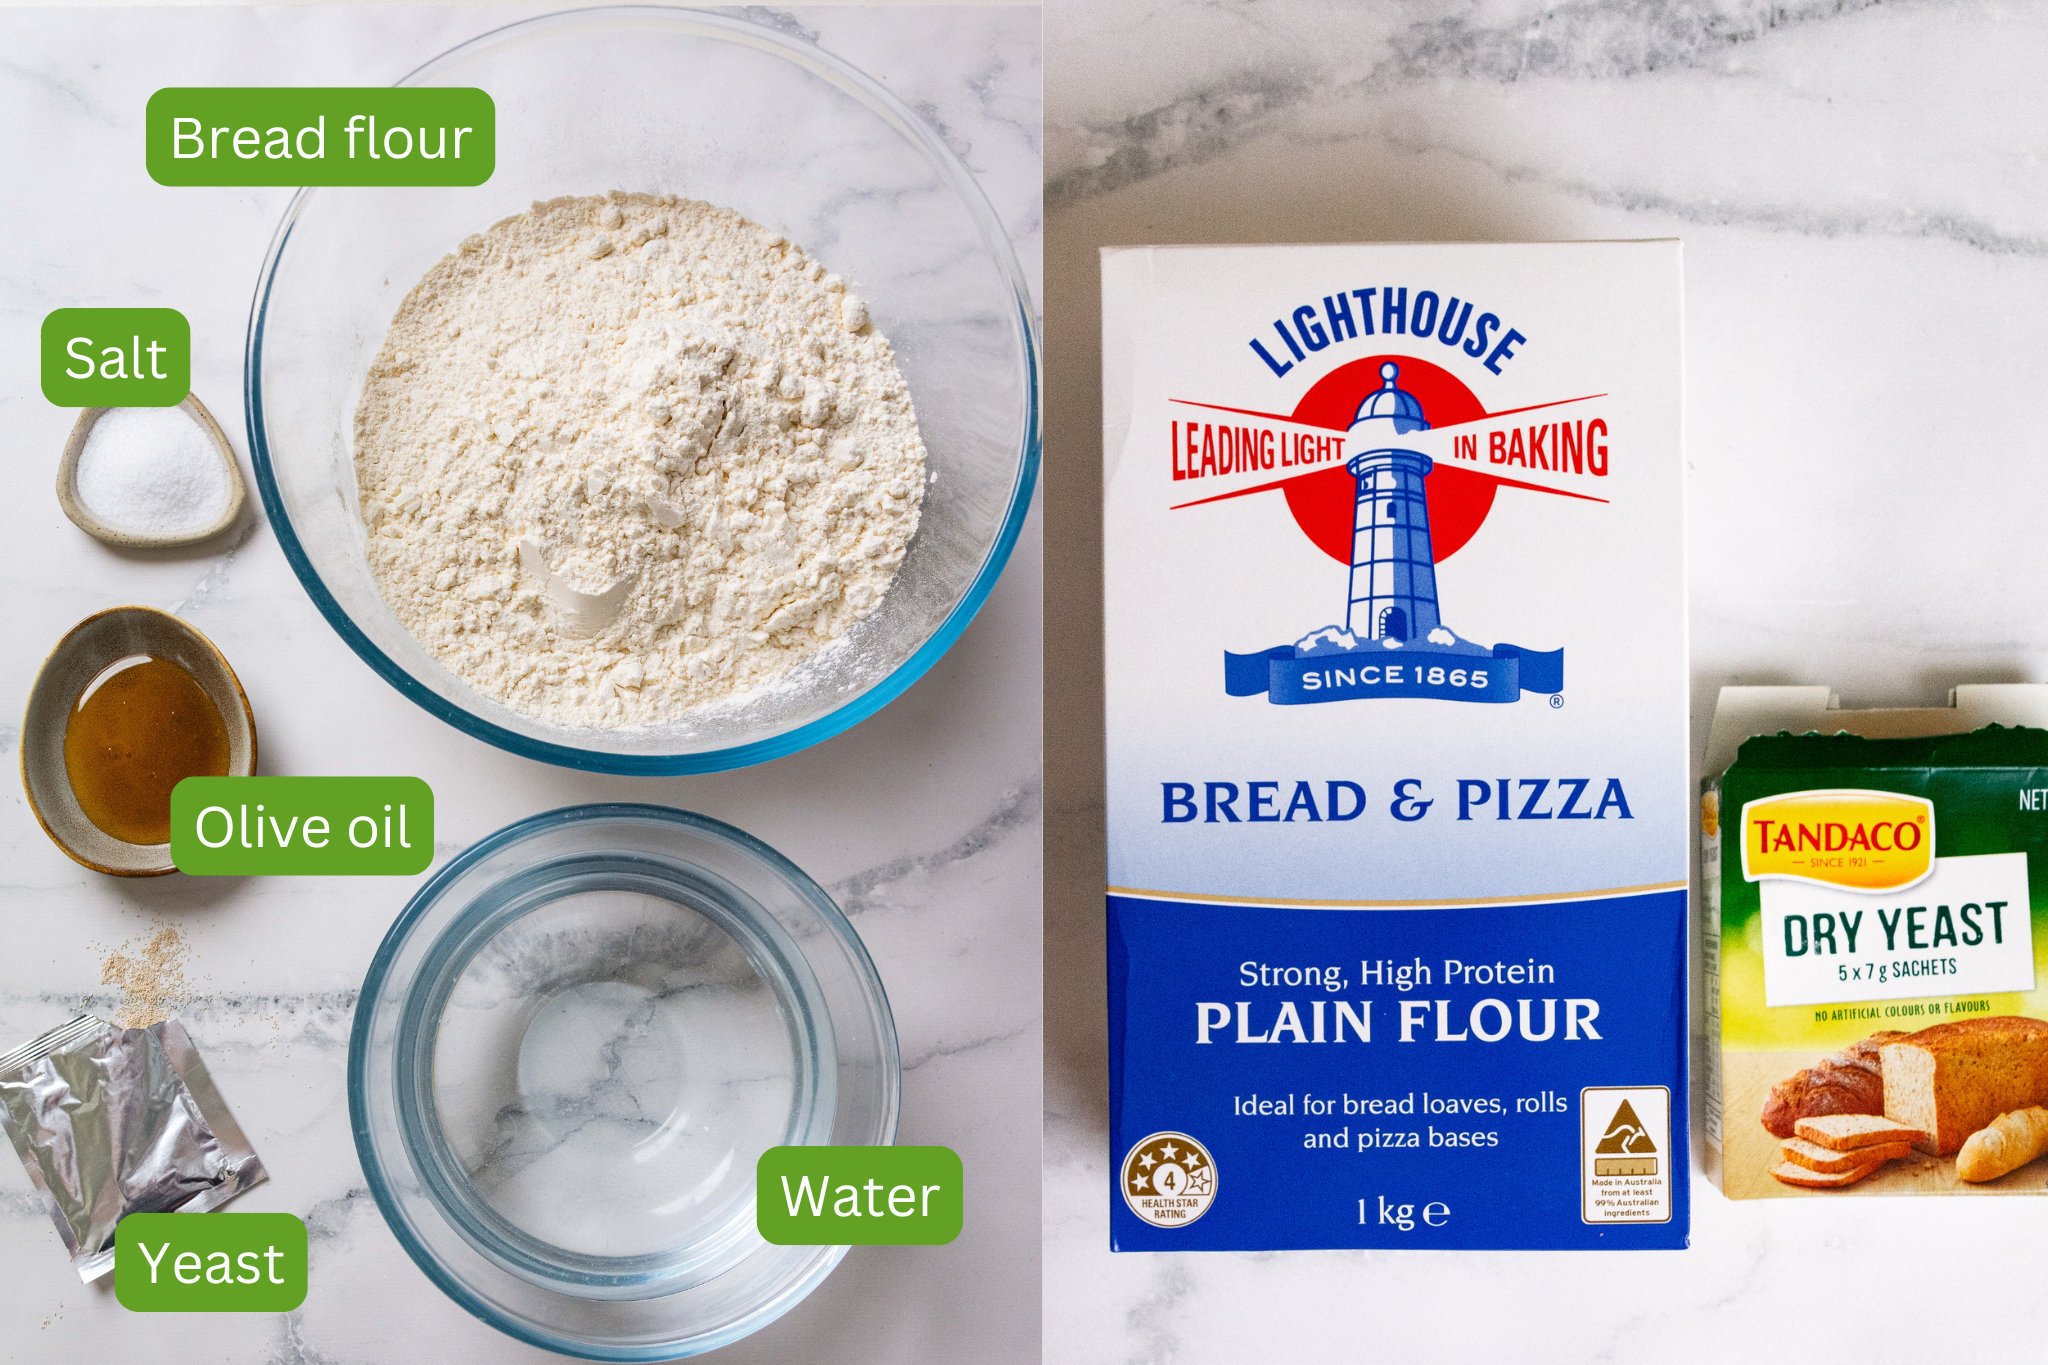
- Bread flour: I like to use bread flour over all purpose flour as it creates a softer and chewier bread. The brand I like to use is by Lighthouse. If you can’t get your hands on bread flour, all purpose regular flour will work just fine!
- Yeast: I always opt for a dry yeast which is a type of dehydrated yeast used in baking to help dough rise. It’s made up of dormant yeast cells that become active when mixed with warm water. The brand of dry yeast I like to use is by Tandaco as they come in conveniently sized 7g sachets. You could also use instant yeast! Just skip the step of adding the yeast to the water as instant yeast can be added straight to your flour.
- Salt: Fine kosher sea salt is best for when making doughs.
- Olive oil: Olive oil is the most important ingredient when making focaccia! It gives the bread its signature golden crust, rich flavour, and tender, pillowy texture. Always use a high quality extra virgin olive oil when making focaccia!
- Garlic butter: A mix of soft butter, garlic confit cloves and lots of fresh herbs. You could also buy pre-made garlic butter if you are short on time.
How To Make Garlic Butter No-Knead Focaccia
Making this garlic butter focaccia is as easy as mixing the no knead dough, letting it rise and drenching it in homemade garlic butter before baking.
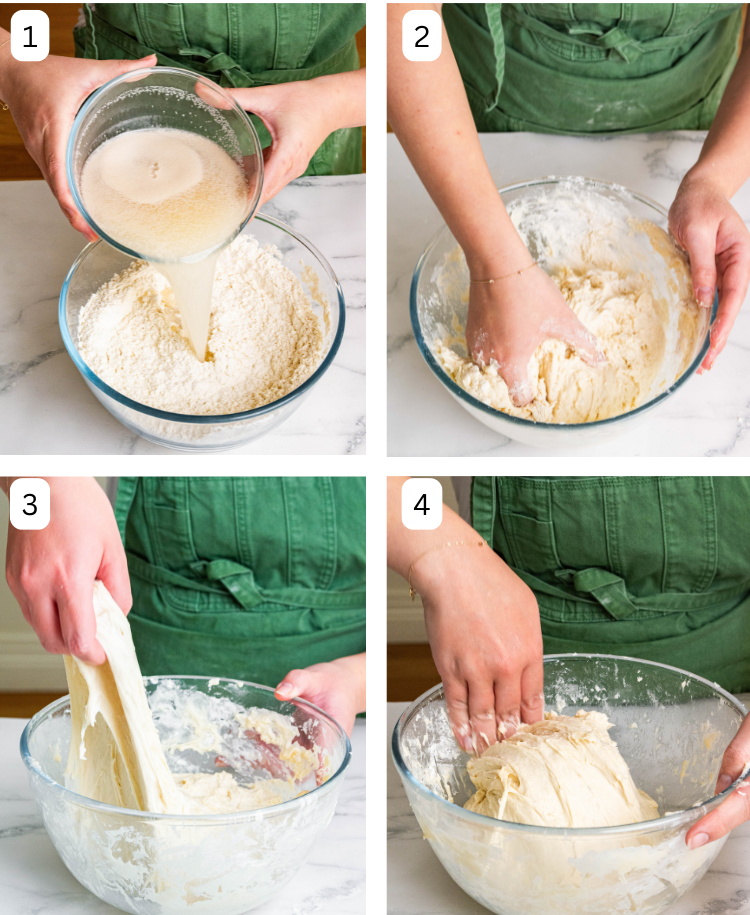
- Step 1: Whisk flour and salt. Then, pour in the yeast mixture
- Step 2: Mix together the dry and wet ingredients with a spoon or your hands. Continue to mix until you form a wet, sticky dough without dry spots. Cover the bowl with plastic or a damp cloth for 10 minutes.
- Step 3: Afterward, with damp hands, stretch a piece of the dough and fold it across itself. Turn the bowl and repeat this action three more times or until a ball begins to form, covering the dough again for another 10 minutes.
- Step 4: Continue this stretching and folding process until the dough shapes into a ball.
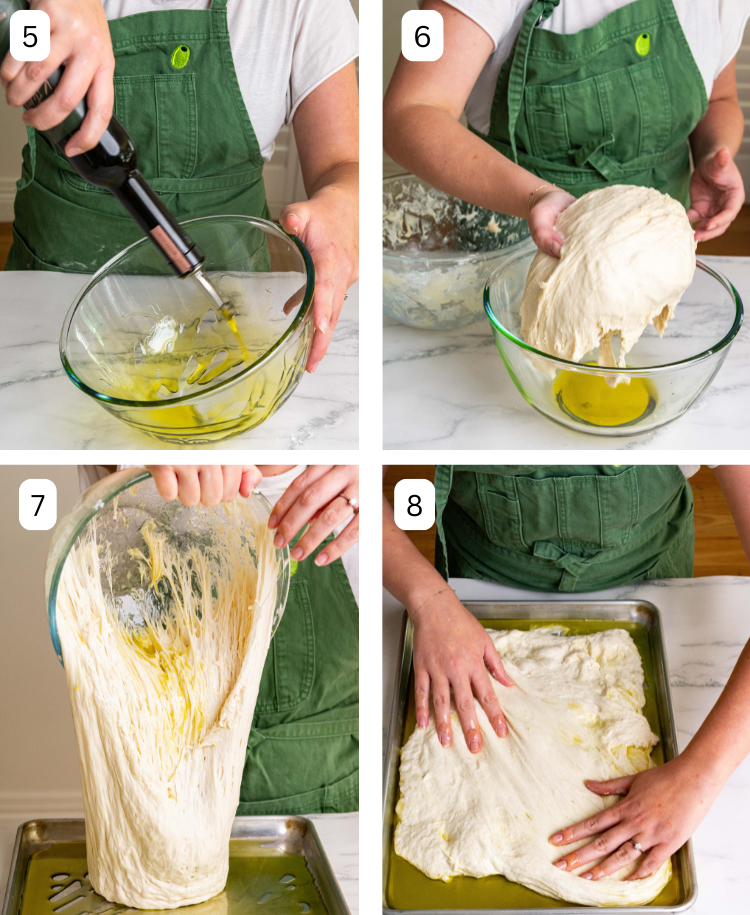
- Step 5: Coat a clean bowl with 20g of olive oil.
- Step 6: Place the dough inside the oiled bowl and cover it tightly with plastic. Let it rest in the fridge between 12 to 72 hours; this is the first proof.
- Step 7: Oil a baking tin with another 20g of olive oil and transfer the dough to it.
- Step 8: Gently stretch the dough to a rough rectangle, but not to the tin’s edges—it will spread as it rises. Cover and let the dough rise for 2 hours in a warm spot or until it doubles in size.
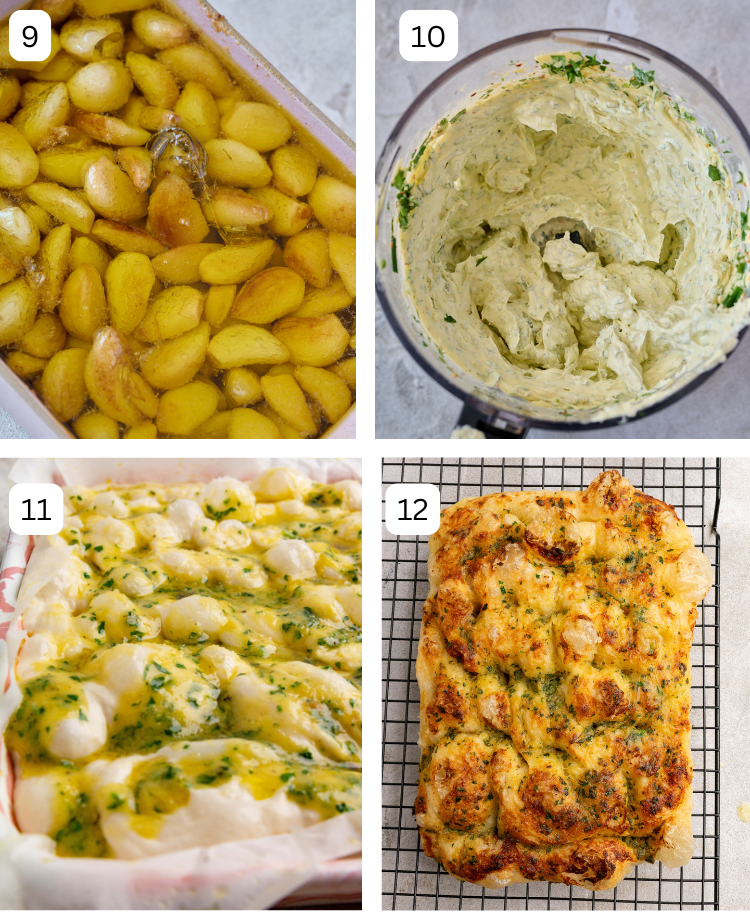
- Step 9: While the dough proofs, make your garlic confit.
- Step 10: Combine all ingredients for the garlic butter into a blender and blend until combined.
- Step 11: Dimple the dough with your fingers. It’s best to oil your hands to prevent them from sticking to the dough and drizzle the garlic butter all over.
- Step 12: Bake for 30 minutes at 400°F / 200°C or until golden and crunchy on the outside.
FAQ’s
Yes, you can, but my homemade garlic butter (made with garlic confit and fresh herbs) is much tastier!
Absolutely. The no knead dough can rest overnight in the fridge and will develop even better flavour and texture.
No! This focaccia is completely no knead. A bowl, a spoon, your hands and time are all you need.
Yes, both work well. Just follow the same measurements and skip the step where the yeast needs to be activated in water.
34cm x 23cm x 5cm.
How To Serve
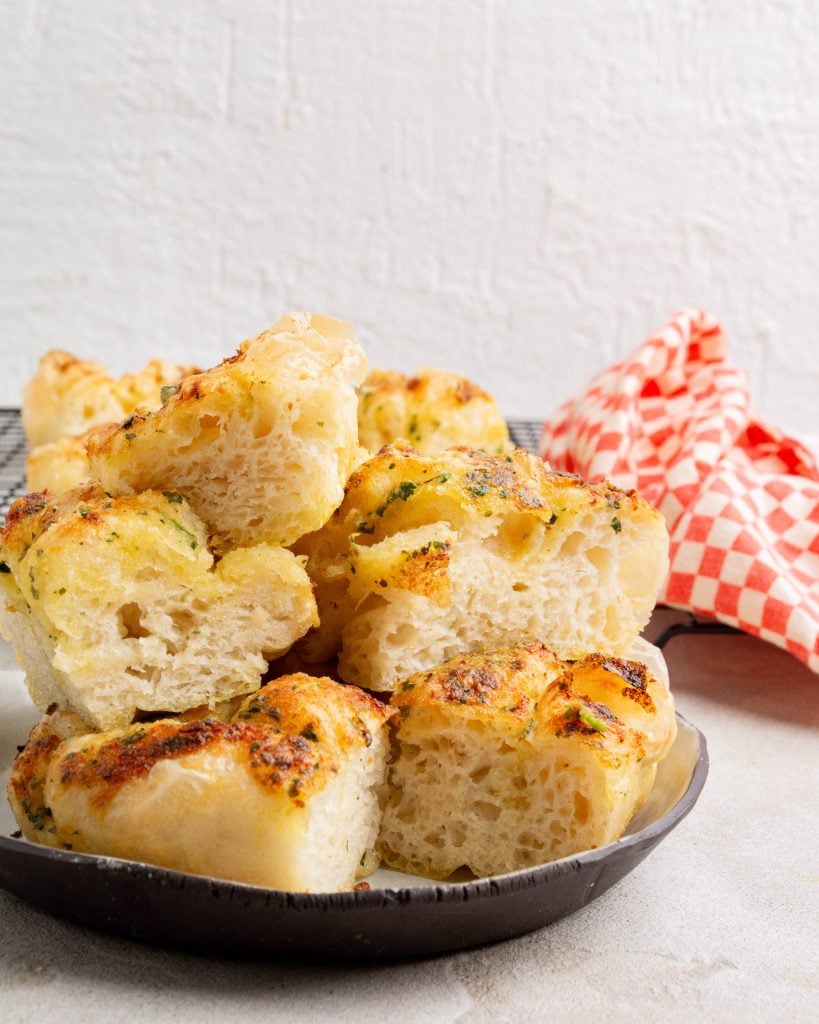
- Serve warm, straight from the oven, when the garlic butter is still melting into all the little focaccia pockets.
- Slice it into thick squares and pair it with rich tomato based pasta, dipped into a creamy soup or a bright green salad.
- Use it as the base for sandwiches! It makes the most incredible focaccia panini.
- Tear it apart and serve as a starter with olives, burrata or a drizzle of extra olive oil.
How To StORE
- Store any leftovers in an airtight container at room temperature for up to 2 days. You can also keep in the fridge for up to 6 days.
- Warm slices in the oven or air fryer for a few minutes to bring back that crispy, fluffy texture.
- You can also freeze the focaccia for up to 3 months — just wrap it well and thaw before reheating.
More Garlic Butter Recipes!
If you make this garlic butter no-knead focaccia, please tag me on Instagram, Tik Tok or Pinterest so I can see your wonderful creations! If you have any questions or would like to leave a review, please do so here! I always love answering your food and recipe related questions and hearing your feedback on my recipes.

Garlic Butter No-Knead Focaccia
Ingredients
Garlic Butter
- 2 bulbs garlic
- 1 tbsp olive oil
- 6 tbsp unsalted butter, at room temperature
- 1/4 cup chives , finely sliced
- 1/2 cup parmesan, grated
- salt and pepper
Focaccia
- 700 g bread flour
- 680 g lukewarm water, (100 degrees F / 34 degrees C) 95% hydration
- 7 g dry yeast
- 12 g fine sea salt
- 1 tbsp honey, optional
- 60 g extra virgin olive oil
- 4 tbsp garlic butter
Instructions
Garlic Butter
- Preheat oven: Preheat oven to 200°C / 400°F
- Bake garlic: Using a sharp knife, slice the top off the garlic bulbs, about 2 – 3 cm down from the top to expose the raw cloves. Place the bulbs of garlic into the centre of an oven proof dish, drizzle with olive oil and season with salt and pepper. Bake for 1 hour.
- Remove garlic cloves: Take the dish out of the oven and remove the garlic from the dish and set to the side. Allow to slightly cool until you are able to handle it. Using your fingers, squeeze the roasted garlic cloves out of their skin.
- Blend butter: Place the garlic cloves, butter, chives, parmesan and pinch of salt and pepper into a food processor and blend. Alternatively, everything can be mashed together with a fork in a large bowl.
No-Knead Focaccia
- Activate yeast: In a medium bowl, mix together the lukewarm water, yeast and honey with a whisk and leave to sit for 5 minutes or until the yeast has foamed. This will indicate that your yeast is active.
- Dry ingredients: In a large bowl, combine the flour and salt and whisk together. Add the yeast water to the bowl with the flour and bring together with a wooden spoon or your hands until the flour and water is combined and there are no dry parts. The dough should be wet and sticky. Cover with plastic wrap or a damp tea towel and leave to sit for 10 minutes.
- Stretch & fold: Uncover the dough and begin to stretch and fold. To do this, wet your hands, then take a section of the dough and stretch it up and fold it onto itself on the opposite side. Rotate the bowl and repeat this step three more times until you have gone all the way around the bowl. Cover and leave to rest for 10 minutes. Repeat the stretch and fold method until a neat ball has formed.
- 1st proof: In a clean bowl, drizzle 20g of extra virgin olive oil all around the sides and into the bottom. Transfer the dough to the oiled bowl and cover very well with plastic wrap. Leave to rest in the fridge for a minimum of 18 hours and maximum of 72 hours. This is the first proof.
- 2nd proof: Prepare a baking tin (34cm x 23cm x 5cm) by greasing it with 20g of extra virgin olive oil. Transfer the proofed dough to the oiled baking tin. Using your fingers, stretch the dough out slightly into a rough rectangular shape. There is no need to stretch the dough out to the edges of the pan as the dough will rise and spread. Cover the tin with a damp tea towel and leave the dough to rise in a warm area of your house for 2 – 3 hours. If your dough is uncovered there is risk of too much air getting into the dough and creating a dry and crusty layer on top.
- Preheat oven: Preheat oven to 200°C / 400°F
- Melt butter: Melt 4tbsp of garlic butter in the microwave or on a low heat on the stovetop.
- Dimple & bake: Once the dough has risen, use your fingers to dimple the dough. Drizzle the dough with the garlic butter and 1 tbsp of olive oil. This will help the crust of the dough get golden and crispy when baking. Finish off with a sprinkling of flakey sea salt. Bake for 30 minutes or until the dough has developed a golden crust on top.
- Slice & serve: Let the bread slightly cool before removing it from the baking tray. Place onto a wire rack and leave to rest for 30 minutes before slicing into it.
Notes
- Yeast: I like to use dry yeast that needs to be activated in water however, you can use instant yeast if you prefer. There is no need to activate instant yeast so simply add it to the dry ingredients along with the water and honey.
- Flour: If you don’t have bread flour, all purpose flour will also work.
- Garlic butter: Store any leftover garlic butter in the fridge for up to 7 days!
Nutrition
Nutrition information is automatically calculated, so should only be used as an approximation.
 Like this? Leave a comment below!

Absolutely delicious recipe.
Thank you for the lovely feedback!
The recipe calls for 60g of extra virgin olive oil but it doesn’t say when to put it on the dough, so im confused.
I have updated the recipe page so it’s a bit more clear to read!
Overall it was delicious the texture was wonderful and the taste very nice. But for me the dough was a little too wet and it was a bit difficult to work with, additionaly the garlic butter on the focaccia had a slight bitter taste. Does anybody have tips for my little problems?
Thank you😁
It’s a very high hydration dough but it should come together after the stretch and folds! Did you do this multiple times?
Absolutely delicous and unforgettable! This was my first time making focaccia and now im addicted to it! Imma be real with you, i had no bread flour on me and all i had was unbleached all purpose flour. Regardless, me and my family devoured the entire thing. This recipe was amazing and I’ll definitely have to remake it! ♡
I am so happy to hear this!
Love this recipe. I use my own recipe for the actual focaccia bread but I love your garlic butter recipe!
Just a question though, how do you store it properly?
I roll it into a log in baking paper and store in the fridge for up to 2 weeks. So glad you like it!
Hi,
The video shows the raw cloves in oil in a little ramekin, however the recipes says to bake 2 whole bulbs (tops cut off) drizzled in oil.
Does it matter which one we do?
I can’t wait to try this!
Many thanks,
Julie.
It does not matter which way you decide to roast the garlic. Enjoy!
Heyy, I’d love to make this recipe but I have one quick question: what type of bread flour do you use because here in germany we have flour type 405, 550 and so on?
I have never heard of those flour types! We just have flour that is called “bread flour”. You could also use all purpose if that is easier for you!
I expected it to be more dense, but it came out super fluffy! Delicious.
So happy to hear that you loved it!