Olive no-knead Focaccia
Mar 28, 2025
Jump to RecipeThis post may contain affiliate links. Please see our disclosure policy.
Looking for an easy, flavorful bread recipe with no kneading required? This Olive No-Knead Focaccia is the one. Packed with briny green olives, fresh rosemary, flaky sea salt, and a generous drizzle of olive oil, this golden, crusty focaccia is a Mediterranean dream.
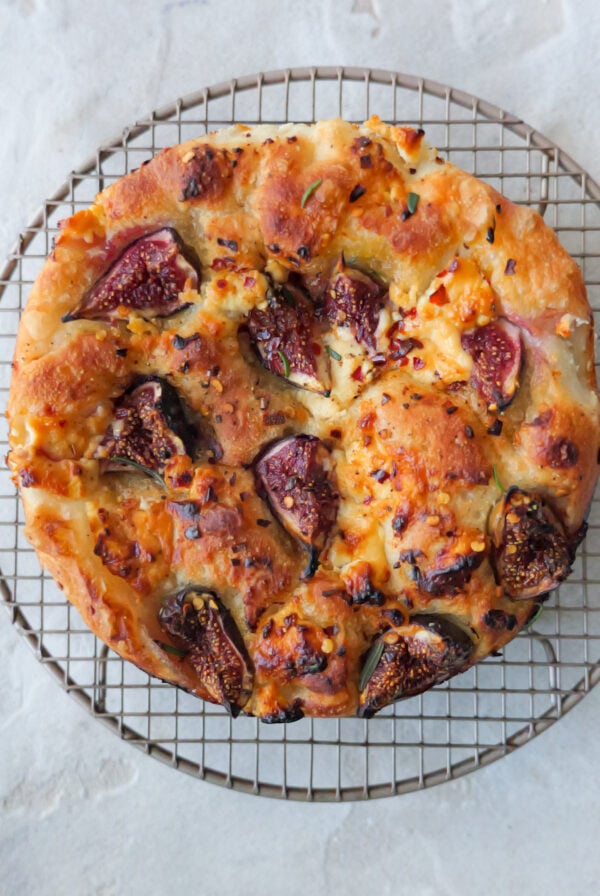
Love my no-knead focaccia? Then you’ll definitely want to try my Fig & Goat’s Cheese Focaccia and Wild Garlic Confit Focaccia next.

Looking for an easy, flavorful bread recipe with no kneading required? This Olive No-Knead Focaccia is the one. It’s made with a simple, slow-rise dough that develops a deep, complex flavor and a beautifully airy texture—no stand mixer or elbow grease needed.
The star of the show is a generous mix of briny green and black olives, which infuse the bread with salty, savory goodness in every bite. Finished with fragrant rosemary, flaky sea salt, chilli flakes and a golden drizzle of extra virgin olive oil, this focaccia bakes up with a crisp crust and pillowy center that’s impossible to resist.
Whether you’re serving it alongside mussels with a rich tomato and chilli broth, slicing it into a crispy eggplant sandwich, or enjoying it with some fresh pesto spread all over, this focaccia is a crowd-pleasing, low-effort showstopper.
Why You’ll Love This Recipe
- No kneading, no fuss – Just mix the dough, let it rise, and bake. Perfect for beginners or busy bakers.
- Packed with bold, Mediterranean flavor – Briny olives, fragrant rosemary, and flaky sea salt in every bite.
- Golden, crispy crust with a soft, airy center – Bakery-quality texture with minimal effort.
Ingredients
With humble ingredients like flour, olive oil, and briny olives, this olive no-knead focaccia celebrates the simple, sun-soaked flavors of the Mediterranean.
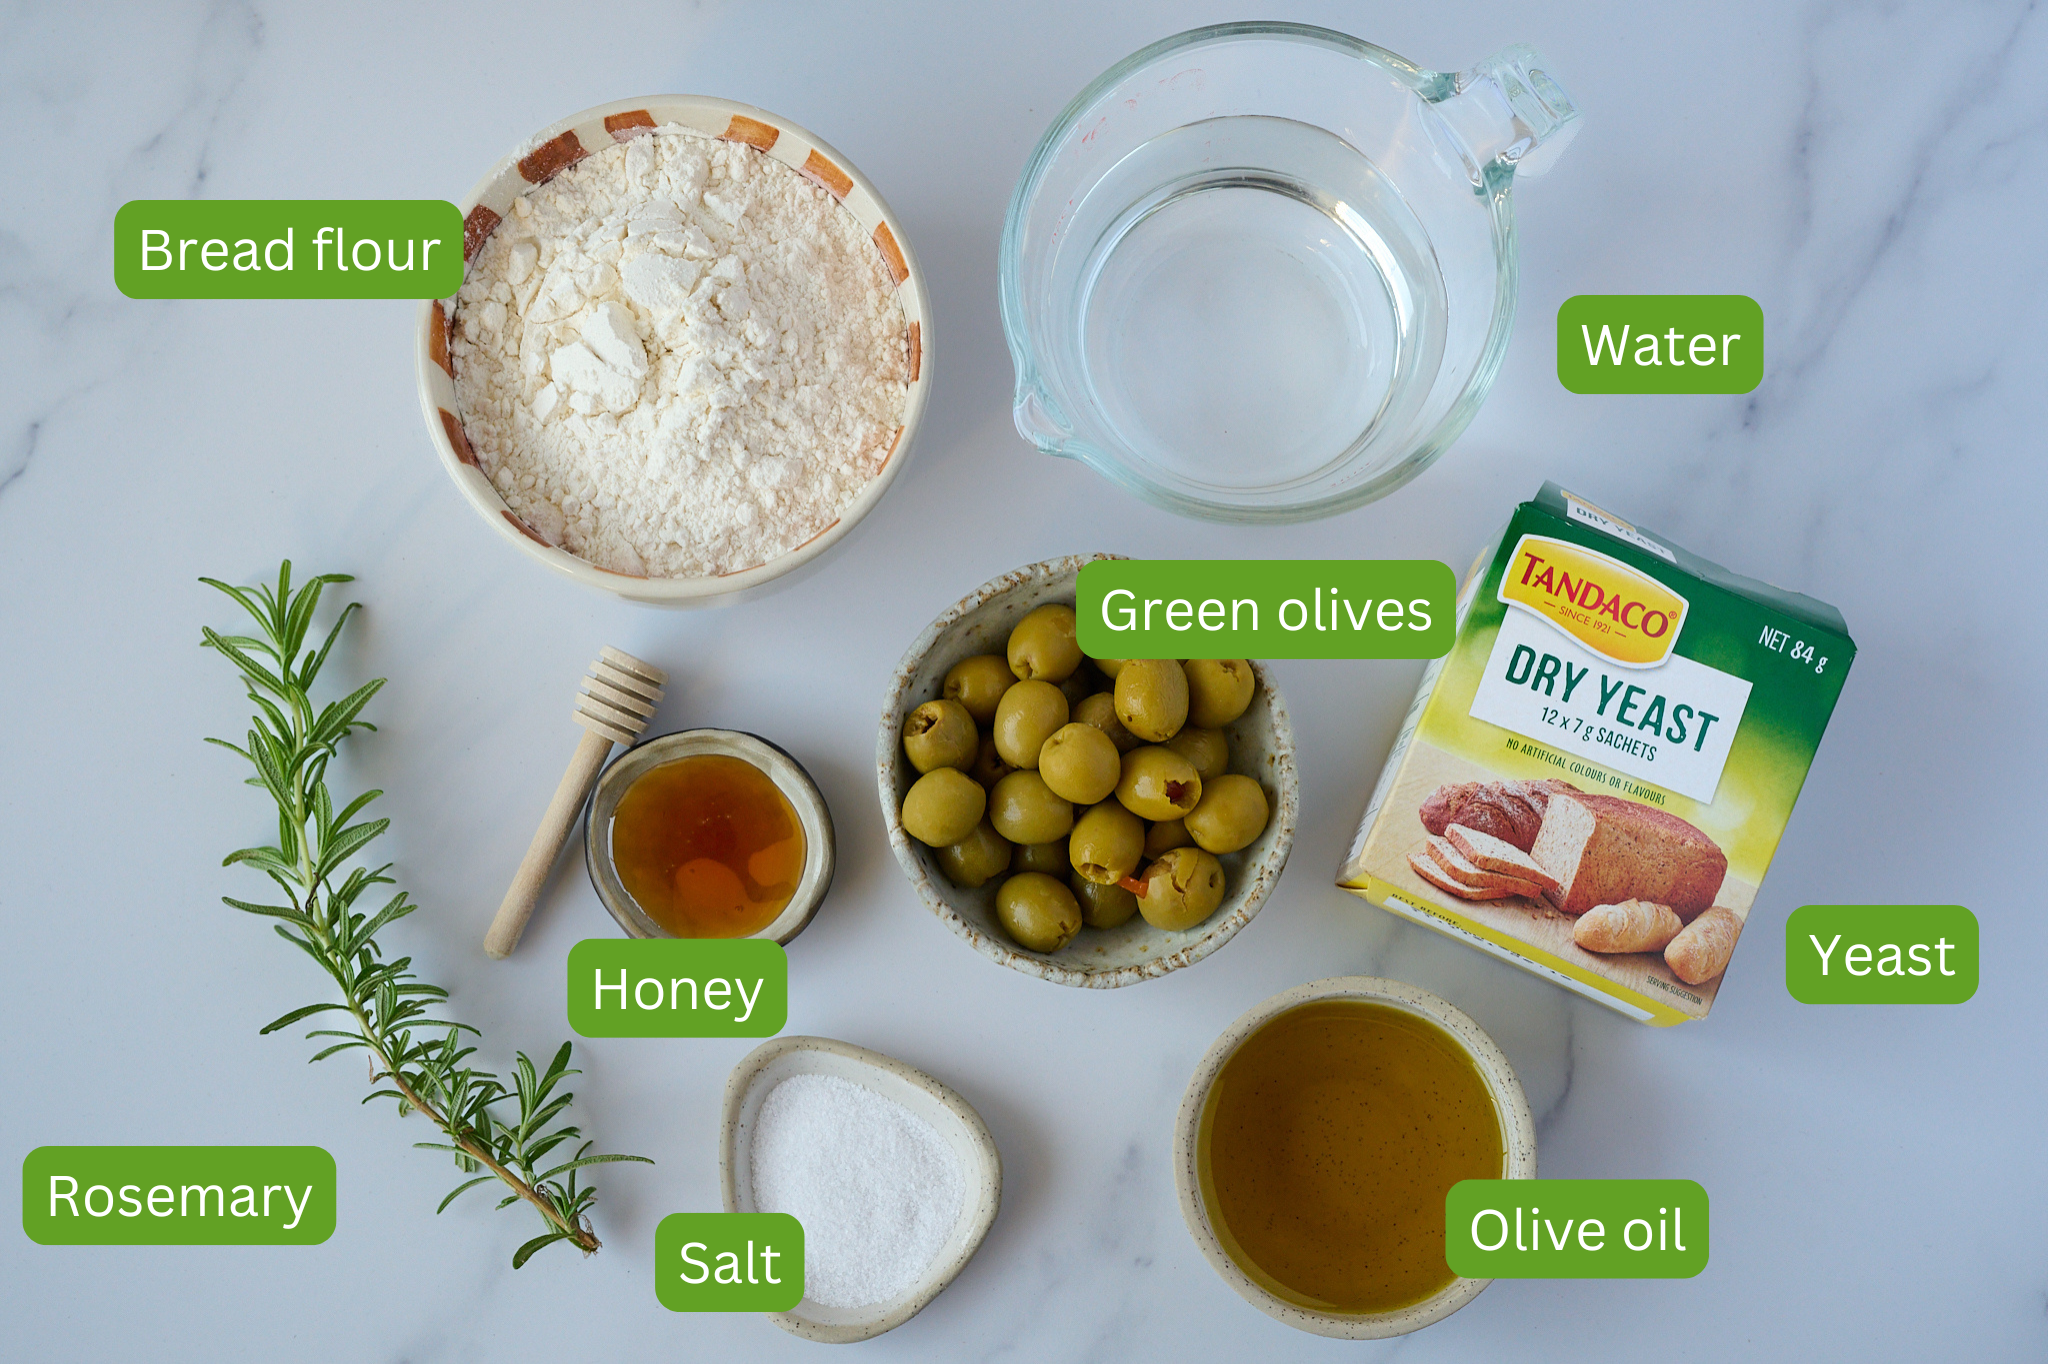
- Green olives: Their briny, salty flavor infuses the dough with a bold, savory bite that perfectly complements the soft, airy crumb. I love to use red pepper stuffed olives!
- Bread flour: Provides structure and a deliciously chewy texture; if you only have all-purpose flour, it will still work beautifully with a slightly softer result.
- Olive oil: A generous amount of good-quality extra virgin olive oil gives the focaccia its rich flavor, golden color, and irresistibly crisp edges.
A full ingredient list with exact amounts can be found in the recipe card below.
How to Make Olive no-knead Focaccia
This green olive focaccia recipe guides you through making the no-knead focaccia dough from scratch—it’s the heart of the bread—while the toppings are the fun, fuss-free finishing touch.
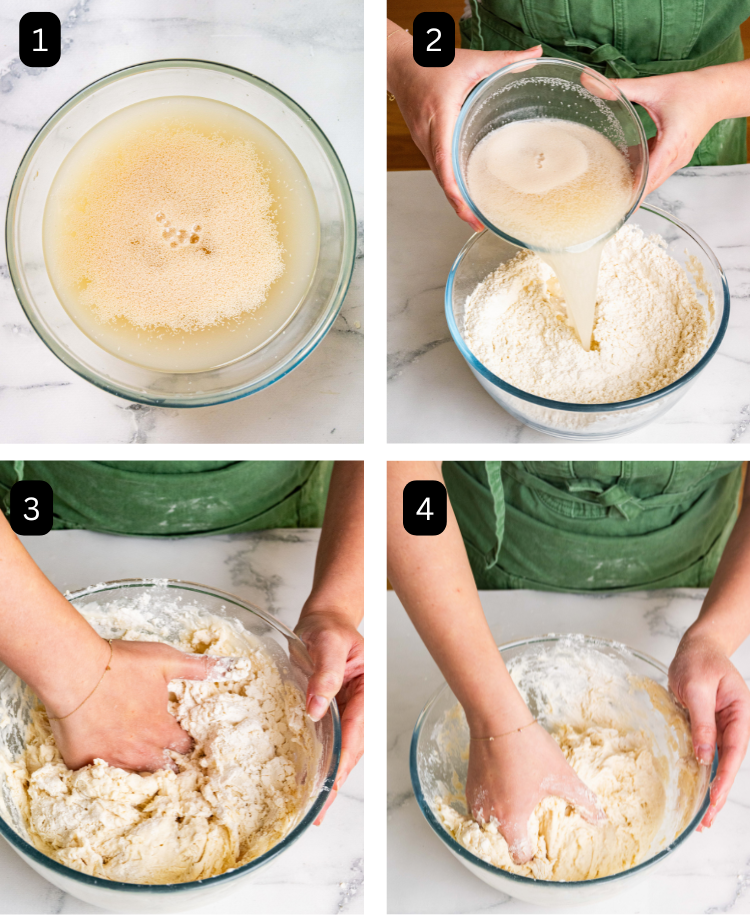
- Step 1: Begin by stirring lukewarm water, yeast, and honey in a medium bowl with a whisk. Wait for about 5 minutes until the mixture becomes frothy, signalling that the yeast is ready (image 1).
- Step 2: Whisk flour and salt. Then, pour in the yeast mixture (image 2).
- Step 3: Mix together the dry and wet ingredients with a spoon or your hands (image 3).
- Step 4: Continue to mix until you form a wet, sticky dough without dry spots. Cover the bowl with plastic or a damp cloth for 10 minutes. This dough has a very high hydration so it’s important the dough is left to rest for 10 minutes prior to the first stretch and fold (image 4).
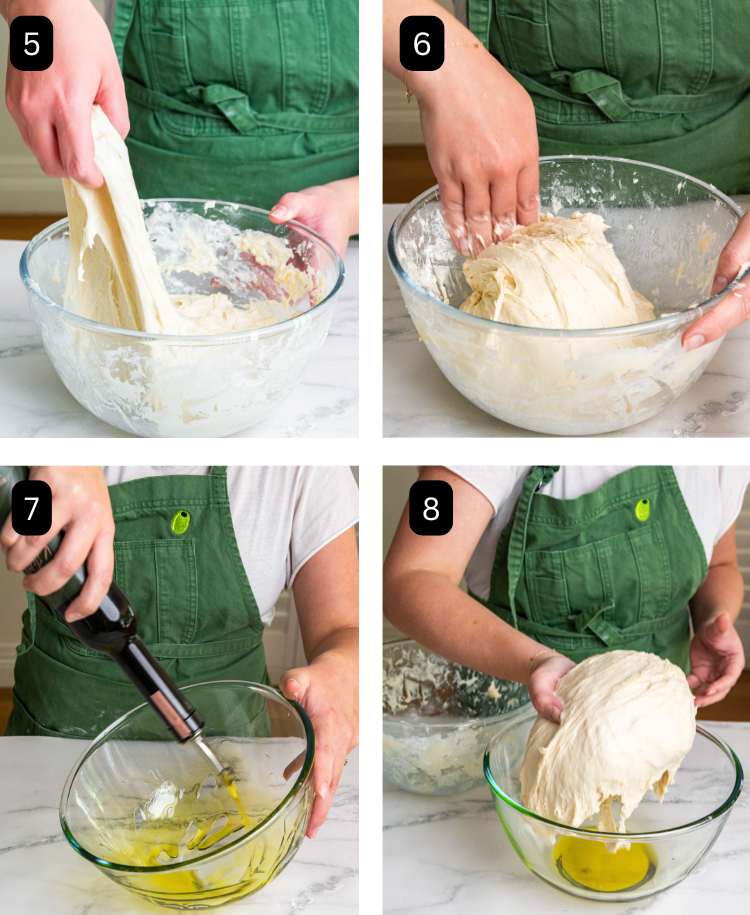
- Step 5: Afterward, with damp hands, stretch a piece of the dough and fold it across itself. Turn the bowl and repeat this action three more times or until a ball begins to form, covering the dough again for another 10 minutes (image 5).
- Step 6: Continue this stretching and folding process until the dough shapes into a ball (image 6).
- Step 7: Coat a new bowl with 20g of olive oil, place the dough inside (image 7 & 8) and cover it tightly with plastic. Let it rest in the fridge between 18 to 72 hours; this is the first proof.
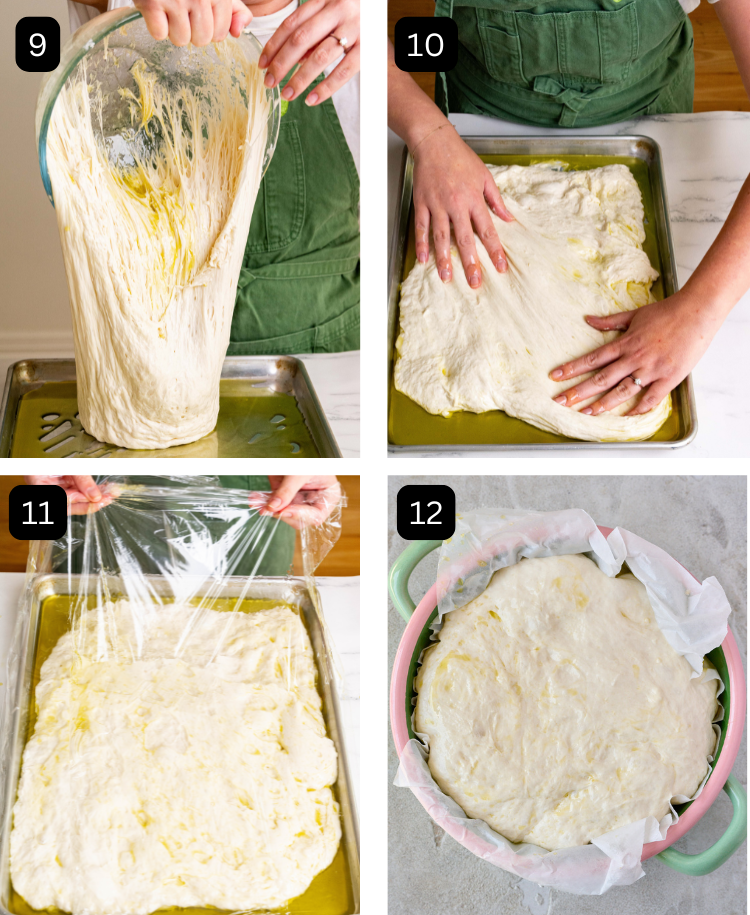
- Step 10: Oil a baking tin with another 20g of olive oil and transfer the dough to it. (image 9). Gently stretch the dough, but not to the tin’s edges—it will spread as it rises (image 10).
- Step 11: Protect it with a damp cloth or plastic wrap (image 11) and let it rise for 2 hours in a warm spot or until it doubles in size (image 12).
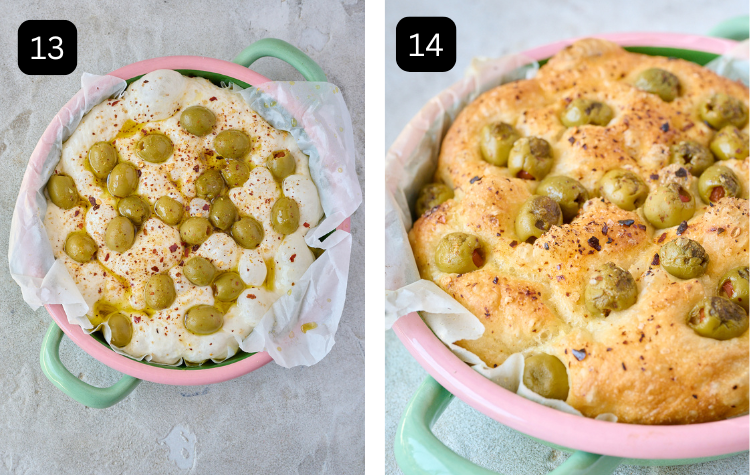
- Step 12: Top the focaccia dough with green olives, chili flakes, salt and pepper and an extra drizzle of olive oil (image 13).
- Step 14: Bake for 30 minutes at 400°F / 200°C or until golden and crunchy on the outside (image 14).
FAQ’s
No, focaccia doesn’t need to be kneaded—especially with a no-knead recipe like this one. Instead, simple stretch-and-fold techniques and a slow rise help develop the dough’s structure and texture, making it light, airy, and perfect every time.
Yes, you can make focaccia without bread flour! All-purpose flour works really well and still gives you a soft, fluffy texture with a crisp, golden crust. Bread flour will give a slightly chewier bite, but all-purpose is a great substitute and perfect for this no-knead recipe.
Check the temperature – Dough rises best in a warm environment. If your kitchen is cold, try placing the bowl in a turned-off oven with the light on or near a warm spot.
Give it more time – Sometimes dough just needs a little extra time, especially in cooler conditions. Be patient and check back after another 30–60 minutes.
Check your yeast – Make sure your yeast is fresh and active. Expired or improperly stored yeast won’t rise properly.
Add a warm water bath – You can place your bowl over a larger bowl of warm water to gently warm it up and kickstart fermentation.
If none of these help, it’s possible the yeast was inactive from the start—next time, bloom it in warm water first to test it before mixing.
Keep it in an airtight container at room temperature for up to 2 days. Reheat in the oven for a few minutes to revive that crisp crust.
Not at all! I love using capsicum-stuffed green olives for extra flavor, but you can mix in black olives or use whatever kind you like best. Just make sure they are pittted!
Expert Tips for olive focaccia
- Let it rest – For the fluffiest, lightest dough, rest the dough for 12–72 hours if you can. If short on time, aim for at least 8 hours.
- Use a big bowl – The dough will double or triple in size, so give it plenty of space and cover it with plastic wrap or a silicone lid.
- Olive oil matters – This recipe relies on high-quality extra virgin olive oil for flavor and texture. I recommend using Rich Glen Olive Oil.
- Warm second rise – Find a warm spot for the second rise. In winter, try turning on your oven light and letting the dough rise inside.
- Flour swap – Bread flour gives a chewier result, but all-purpose flour works just as well if that’s what you have.
Store
To store your olive no-knead focaccia, keep it in an airtight container at room temperature for up to 2 days. If it starts to lose its crispness, simply reheat it in the oven for a few minutes to bring back that golden crust. For longer storage, slice and freeze it—just pop it in the oven straight from the freezer when you’re ready to enjoy.
Serve
This olive no-knead focaccia is incredibly versatile and can be served warm or at room temperature. Enjoy it on its own as a snack, dipped into olive oil or creamy garlic and herb dip. Serve it alongside a rich potato and leek soup, salads, or cherry tomato pasta. It also makes the perfect base for delicious sandwiches—just slice it horizontally and fill with your favourite ingredients.

More Focaccia recipes


Have questions or want to leave a review about this olive no-knead focaccia? Please do so below the recipe card! I always love answering your questions and hearing your feedback.
If you make this recipe, please follow me and tag me on Instagram, Tik Tok, or Pinterest so I can see your wonderful creations!

Green Olive No-Knead Focaccia
Ingredients
Focaccia dough
- 700 g bread flour
- 680 g lukewarm water, (100°F / 34°C) – 95% hydration
- 7 g dry yeast
- 12 g fine sea salt
- 1 tsp honey
- 60 g olive oil, extra virgin
Olive topping
- 4 oz green olives, pitted
- 1 tbsp olive oil, extra virgin
- 1 tbsp rosemary, finely chopped
- 1 tsp chili flakes, optional
- flaky sea salt
Instructions
Focaccia dough
- Activate yeast: Stir water, yeast, and honey in a medium bowl with a whisk. Wait for about 5 minutes until the mixture becomes frothy, signalling that the yeast is ready.
- Dry ingredients: In a different large bowl, whisk flour and salt. Then, pour in the yeast mixture, stirring with a spoon or your hands to form a wet, sticky dough without dry spots. Cover the bowl with plastic or a damp cloth for 10 minutes.
- Stretch and fold: Afterward, with damp hands, stretch a piece of the dough and fold it across itself. Turn the bowl and repeat this action three more times, covering the dough again for another 10 minutes. This is the stretch and fold method and it will strengthen your dough. On the final stretch and fold, continue until the dough shapes into a ball.
- 1st proof: Coat a new bowl with 20g of olive oil, place the dough inside, and cover it tightly with plastic. Let it rest in the fridge between 12 to 72 hours; this is the first proof. We only need half of the dough for this recipe so slice the dough in half and use the second half for a different recipe.
- 2nd proof: Oil a baking tin with another 20g of olive oil. Move the dough there, gently stretching it to a rough rectangle, but not to the tin's edges—it will spread as it rises. Protect it with a damp cloth and let it rise for 2 hours in a warm spot.
Olive focaccia
- Preheat oven: Preheat your oven to 200°C (390°F).
- Toppings: After the rise, dimple the dough with your fingers. Scatter the olives, rosemary and chili flakes, if using, all over. Season with salt and drizzle over olive oil.
- Bake & rest: Bake for 30 minutes until golden on top.Allow the focaccia to cool slightly before transferring it to a wire rack to rest for 15 minutes. Slice into it and serve immediately.
Video
Notes
- Dough: We only need half of the dough for this recipe so slice the dough in half and use the second half for a different recipe. You can use many of focaccia toppings!
- Yeast: I like to use dry yeast that needs to be activated in water however, you can use instant yeast if you prefer. There is no need to activate instant yeast so simply add it to the dry ingredients along with the water and honey.
- Flour: If you don’t have bread flour, all purpose flour will also work.
Nutrition
Nutrition information is automatically calculated, so should only be used as an approximation.
 Like this? Leave a comment below!


oke4d
Can I use prepared frozen dough for this recipe?? It’s store bought. And if so do I still sit it in olive oil for so many hours after I defrost it??
I’m not much on making my own dough! Lol
I have never seen frozen focaccia dough before so I cannot help you I am afraid! Perhaps check what the instructions say on the packet!